

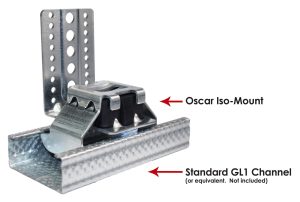
The Oscar Iso-Mount is specifically designed for isolated ceiling installations onto timber floor joists, working only from the room below.
Loading
Maximum loading of an Oscar Iso-Mount is 18kg.
Spaced evenly at 3 Iso-Mounts per square metre the maximum loading per square metre is 54kg.
Typical loading calculation for 220mm (8.66 inches), deep joists:
| kg | |
|---|---|
| 2 x layers of 12.5mm standard plasterboard at 10kg each/sq mtr | 20 |
| 100mm of acoustic thermal cavity fill at 60kg/cu.mtr | 12 |
| C stud channel (GL1 or equivalent) Note: We do not make or supply GL1 gypliner steel channel. You can save money by purchasing this direct from other online suppliers from £0.88 per metre. | 1.2 |
| 4 x Iso Mount saddles at 37grams each | 0.0148 |
| (6.82 lbs/sq.ft)* | Round up (total) 33.3kg/sq.metre |
| 3 Iso-Mounts/m2 evenly spread has a max loading of 54kg/m2 |
Plus: The weight of downlighters, smoke sensors, grills etc. that are to be fixed in the plasterboard. Consult the manufacturers of the plasterboard for fixtures to be fixed directly to the plasterboard. Use fastenings as recommended by the manufacturer.
Note: Acoustic insulation is also an excellent thermal insulator. Bring this to the attention of your qualified electrician who may have to allow for heavier duty cables and top hat downlight covers.
Iso-Mount Type1 soundproof ceiling components

The following drawings give further explanation before the installation notes continue…


Prep work for soundproof ceiling installation
1. Remove the existing ceiling, (if refurbishment work), to expose the structural timber joists and the underside of the floor of the room above. Check the condition of the underside of the flooring system of the room above and seal any gaps or holes to provide an airtight seal using Oscar Seal acoustic sealant.
*These prep work for floating ceiling installation instructions continue after the below insulation details…
Installing insulation (for smaller areas up to 100m2)
Rockwool RW3 (60kg/cu.mtr (3.75Lbs/cu.ft) high density mineral wool slab.
Advantages:
- Can be purchased locally to the job
- Can be cut with a wood saw
- Does not require specialist installation machinery
- Mineral Wool is available in slab form in various thicknesses.
1. Order material 100mm thick to fill the depth of the void by 100mm with an air gap between the insulation board and the new ceiling board/s.
2. Install the insulation boards prior to the Iso-mounts.
3. Cut the width to be a tight fit between the joints so that friction will hold the cut boards in place.
4. Apply Rockwool’s recommended adhesive to adhere the boards permanently to the underside of the old ceiling.
*For large areas we recommend Celbar blown insulation – please see Celbar section below*
Prep work for floating ceiling installation instructions continued…
2. Using either a laser level or long spirit level, check the level of the joists.

3. The magnet shown below is a 27mm dia x 25mm deep pot magnet. You will need at least 2 which we can supply for your convenience; they are very useful tools.

4. Ensure the Iso-Mount ‘L’ brackets are fixed so that the level is maintained in all directions.

5. Assemble the floating ceiling Iso-Mounts by pushing the Iso-Rubber into position on the Iso-Saddle – the rubber is held in place by the side guides and the 4 triangular grippers and sits on the raised dimples. Then position the Iso-Saddle (with rubber assembly), onto the base of the Iso-Mount ‘L’ brackets. The Iso-Rubber sits flat and is held in place by 4 triangular grippers and side guides.

Iso-Mount floating ceiling installation
NOTE: Fit the floating ceiling Iso-Mounts to one side of the joist only; this can be either side.
Proceed fixing the Iso-Mount Type1 ‘L’ brackets to the joists using 1 of 2 methods:
METHOD 1:
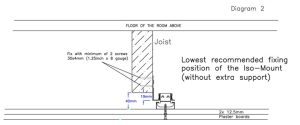
If you are satisfied that the joists are level, proceed by fixing the ‘L’ brackets, measuring from the underside of the joist. This can be anywhere between 16mm above the underside of the joist to the underside of the ‘L’ bracket, (as shown in diagram 1 above), and 19mm below the underside of the joist to the underside of the ‘L’ bracket, (as shown in diagram 2 above). The 16mm above option gives the minimum ceiling height loss of approximately 6mm and the 19mm below option gives a ceiling height loss of approximately 40mm but with more clearance.
Fix the ‘L’ brackets 100mm (4 inches), away from the wall and equally spaced at no more than 1000mm centres (39.37 inches), if joist centres are 400mm (15.75 inches).
NOTE: If in doubt fix an additional bracket and evenly reduce the spacing.
METHOD 2:
You can vertically adjust the positions of the Iso-Mounts to compensate for reasonable deflection in the joists. This is to achieve as flat a ceiling as possible for appearance; it does not affect the noise transfer reduction of the new ceiling.
Identify the lowest position of the lowest joist and mark a vertical line up the side of the joist at this point. Measure 16mm up the line from the underside of the joist and mark a horizontal line. Fix the first Iso-Mount centrally on the vertical line with the underside of the Iso-Mount ‘L’ bracket sitting on the horizontal line 16mm from the underside of the joist; this gives the minimum loss in ceiling height of approximately 6mm, (less than 0.25inch).
If you have chosen minimum ceiling height loss, the first Iso-Mount must be fixed at the lowest point of the ceiling joists: do not fix any Iso-Mounts higher than 16mm above the bottom of the joist, as this may allow the sheets of plasterboard (when fixed), to touch the joists and create a path for noise transfer.
(See diagram 1 above)
The first Iso-Mount fixed at the lowest point of the ceiling joists is the datum for the height of the remaining Iso-Mount ‘L’ brackets. Taking the level from the underside of the fixed Iso Mount, (datum), mark a horizontal line along the joist using a long spirit level or laser, marking the positions of the remaining Iso-Mounts: 100mm (4 inch), away from the wall and equally spaced at no more than 1000mm centres (40inches).
If in doubt, fix an additional bracket and evenly reduce the spacing.
If you have chosen minimal ceiling height loss, the base of the datum Iso-Mount ‘L’ bracket will be above the bottom of the joist. A method of transferring the level to other joists is to use magnets to increase the depth and allow transfer of levels by spirit level or laser.
Fixing the ‘C’ channels (propriety 45mm drylining channel)
These are the channels that the plasterboard will fix to with drylining screws:

1. Hook a length of ‘C’ Channel onto the side, (furthest from the joist), of two Iso-Mounts that are at least 1 metre apart. Then squeeze the ‘C’ Channel and saddle between your thumb and fingers and the channel will snap-fix into position.

2. Repeat this along the length of each joist as required.
3. The ‘C’ Channels run parallel to the joists for the full length of the joists.
NOTE: The ‘C’ Channels must not touch the walls as this will create a path for vibration and noise transfer; leave a gap of about 20mm (3/4 inch), between the C Channel and the wall. Connection between the C Channel and the wall or joist will mean that the sound proof floating ceiling is no longer floating.

Check that:
- The fixed ‘C’ Channel is level and clear of the walls at both ends.
- The Iso-Mounts are still correctly assembled.
- The bottom of the fixed ‘C’ Channel is below the joist by a minimum of 4mm or greater if the loss in ceiling height is not critical.
NOTE: under load the Iso-Mounts will deflect downwards by up to 2mm (0.08 inch).
4. Joining lengths of C Channel should be done in line with the manufacturers standard instructions.
5. The ‘C’ Channels now provide a floating ceiling grid for the installation of the first layer of gypsum panels.

Fixing the Oscar Foam
*This fixes around the walls and the plasterboard abuts to it, isolating your soundproof floating ceiling.
1. Mark a horizontal line around the wall at the calculated level of the underside of the floating ceiling, i.e. level with the underside of the lower plasterboard. When using 2 layers of 12.5mm plasterboard this will be 25mm, (1 inch), below the underside of the ‘C’ Channels.
2. Install 25mm wide x 10mm thick self-adhesive Oscar Foam to sit 12mm above this line with the bottom of the foam on top of and sitting 12mm above the line.
NOTE: This will prevent direct contact between the plasterboard (next job), and the wall: a potential path for vibration and noise transfer. Oscar foam and the Oscar Iso-Mount combined is what creates the floating ceiling.
Fixing the plasterboard
1. Fix the first layer of 12.5mm plasterboard with 25mm (1inch) drylining screws which will self-tap into the ‘C’ channel. Do not position screws under the joists or the Iso-Mounts where they may make contact and form a path for sound transmission. Keep the outer boards compressed into the Oscar Foam at the perimeter of the room. Keep gaps to the minimum and seal gaps with Oscar Seal.
2. For best results fix a second layer of plasterboard repeat the operation but stagger joints and use 38mm (1.1/2inch) drywall screws, seal gaps with Oscar seal keeping level or below the surface of the board, then tape and joint the ceiling ready for plastering.
Plastering
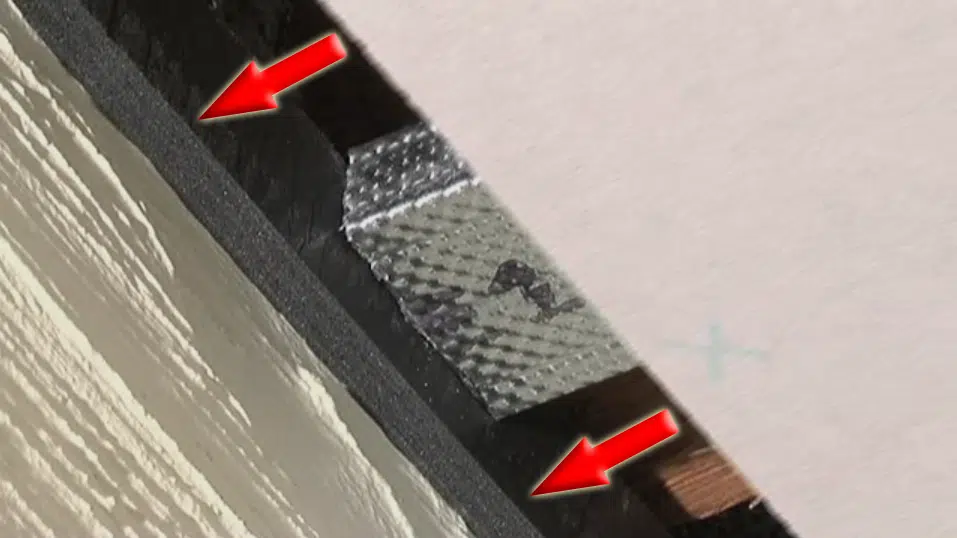
1. Plaster to the walls, i.e. plaster over the Oscar Foam that runs around the perimeter of the ceiling separating the acoustic ceiling from the walls.
2. Before the plaster is fully dry run a flat trowel or blade flat against the wall and through the new plaster to create a gap of 3mm minimum and break all direct contact between the new ‘floating’ ceiling and the walls
3. When the plaster is dry, tidy any nibs caused by creating the gap and seal the gap with Oscar Seal. Oscar Seal is an intumescent flexible acoustic sealant that can be painted over when dry.

The recycled non-hazardous cellulose insulation that is blown into the void with specialist machines – for larger areas of 100m2 plus
Celbar advantages:
- The best performing acoustic insulation
- Non-itchy
- Fire retardant
- Up to 85% recycled
- The lowest embodied energy (the energy used to manufacture) in the insulation industry
- Non-hazardous
- Blown into the void completely filling all gaps
- A very effective thermal insulator and where there are multiple habitations very little heat energy will be lost to adjoining units. Thermal transmittance through a typical ceiling will be better than U = 0.20W/m2K
- Very economical for larger areas
- Holiday Inn, Sheraton and Intercontinental Hotels use Celbar ceiling and wall insulation for minimum sound transmission between rooms ensuring guest comfort
Celbar is manufactured by International Cellulose Corporation, Houston, Tx
ISO 9001: 2000 certification
For non UK installations visit Celbar.com or email info@celbar.com for your local installer
Component Suppliers
Oscar Acoustics
- Oscar Iso-Mount assemblies
- 25 x 10 x 10mtr rolls Oscar-Foam, (1 x 3/8 x 32.8ft)*
- Oscar-Seal Acoustic Sealant
- Celbar Acoustic Void Fill (our recommended insulation for large areas)
Builders merchants:
- Plasterboard
- 45mm Gypframe GL1 Lining Channel and GL3 channel connectors
- Mineral wool
- Fasteners
Fire rated
The Iso-Mount Type1 achieves a 90 minute rating for fire resistance when using two layers of 15mm fireline plasterboard. BRE fire test report available on request
Important Safety Information
- Only competent persons fully conversant with the use of Personal Protective Equipment should carry out the floating ceiling installation.
- Consult the manufacturers of the plaster board for fixtures to be fixed directly to the plasterboard. Use fastenings as recommended by the plasterboard manufacturer.
- Celbar loose fill void insulation (as recommended), is also an excellent thermal insulator. Bring this to the attention of your qualified electrician who may have to allow for heavier cables.